Showing posts with label recipes. Show all posts

Sunday, June 26, 2011

Grand Prize Winner!

Ever since school ended I've really been lacking gusto for my blogging. I've logged in so many times to write something and then decided it was nothing worth hearing and shut my computer off.

About a week ago I auditioned for Aida and thought that would be something fun and new to do. I've been waiting to hear back from them to blog about it, but apparently in Utah County when you don't get cast in a show you just don't hear back from them. I won't go on about how rude I think that is on so many levels, and just say that I started to feel pretty discouraged this week considering that the New Testament Casting STILL hasn't finished casting speaking roles so I haven't heard from them either. Of course, I wrote on my Aida audition form that I was only interested in the Amneris role, and they called back 10 Amneris' which felt like pretty stiff competition. I felt good about the audition I gave though, and it was my first one in almost four years so I'm pretty proud that I at least made the callback.

When I started my blog I loved it so much and I felt like I was constantly getting new ideas to talk about, but lately, inspiration has been lacking.... until YESTERDAY!

About a month ago I entered the Taste of Cedar Hills Festival Baking Competition. I decided to make two dishes to enter:

My Turtle Graham Bars


and My Blueberry Almond Tart

Here are some photos of the other competitor's entries although a few more dishes arrived after I snapped these pictures:


Entries were judged on Appearance, Taste, and Texture and while I thought they would announce a winner in each category (i.e. pies, cakes, cookies, other) they simply judged them all together awarding a People's Choice, Grand Prize, 2nd prize, and 3rd prize.

According to Casey's judgment he said that the Blueberry Almond Tart was a much more impressive dish, but it's subtlety would probably cause it to be over-looked, meanwhile the Turtle Graham Bars have a big WOW factor when you first bite into them. The Tart definitely took a lot more effort to make and I certainly hoped the judges would appreciate the subtle textures, flavors and effort that I put into it!

People's Choice was announced first and it was the Mint Brownies you can see in the second picture on the left side of the red & white box, in between the cake and the dish in the glass pan. Everyone was kind of surprised to see a boy, around 11-years old stepped forward to claim his prize- a girly looking package with paper place-mats and something else I couldn't really see. Then, without any build up or further ado, they jumped right to the Grand Prize winner.

Announcer: OK! And the Grand Prize Winner is..... The Turtle!

::cricket cricket::

I kind of started to step forward because maybe they meant Turtle Graham Bars and I hadn't seen anyone bring a cake in the form of a turtle, but Casey said, "Wait, wait a minute and see if anyone else goes forward."

::cricket cricket::

Audience member: "Is it a valid win if they aren't here to claim the prize?? Maybe someone else can win!"

Um, YEAH. I wasn't going to stand there and let someone else claim my prize!

Me: Do you mean Turtle Graham Bars?

(Announcer looks at her sheet)

Announcer: Yes.

Me: OK. THAT was me. :D

::applause-applause-applause::

For my efforts I got a gift from Lizzy's- a really expensive kitchy boutique/bakery nearby. $25 gift card, a small recipe book packed with delicious chocolate recipes complete with a specially designed CD of self-described "sensual bossa nova music." Plus, I get 50 paper place-mats which, I'm not quite sure what I'm going to do with, but I guess I'll always know which side of the dinner plate I'm supposed to place the fork on now.

Oh, and afterwards I asked one of the judges if my blueberry tart made anyone's list and she replied, "Not mine, but the macadamia cookies were good."

..... Thanks. Really, thanks for that.


Turtle Graham Bar Recipe

Ingredients

  • Approximately 14 graham crackers (if each graham cracker is 5" x 2.5")
  • 1 cup (2 sticks) unsalted butter
  • 1 cup packed dark brown sugar
  • 1 cup chopped pecans
  • 12 ounces dark chocolate, finely chopped & a few ounces white chocolate for decorating

Directions

Preheat the oven to 350 degrees F.

I use a stoneware pan from Pampered Chef which makes the Graham Crackers nice and crunchy, but if you don't have one, you can line a rimmed baking sheet with a silicone mat, or just spray a pan with some canola. Arrange the graham crackers in a single layer on the lined baking sheet.

Put the butter, brown sugar, pecans, and a pinch of salt in a saucepan and bring to a boil. Boil for 2 to 3 minutes, stirring constantly. Pour the butter mixture evenly over the graham crackers and bake for 15 minutes. Remove and set aside.

Meanwhile, melt the chocolate by microwaving it in a bowl for 30 seconds and then stir. Repeat until chocolate is almost melted and stir until completely melted. This process will help temper the chocolate and keep it looking shiny. Also melt your white chocolate using this same method. Pour the chocolate over the toffee-covered graham crackers and spread evenly. Using a spoon, drizzle white chocolate in horizontal stripes across the bars leave 1/2 inch - 1 inch in between stripes. Drag a toothpick vertically through the chocolate, alternating up and down directions to create a beautiful pattern. Chill completely in the refrigerator for about 30 minutes. Cut or break into bars. Enjoy!

Thursday, March 24, 2011

Delicious Chewy Caramel

Caramel- such a heavenly invention! First of all, let's talk about the elephant in the room. Do I pronounce it "ka-ra-mel" and "car-mul?" I actually use both so you can't judge me for one or the other- my opinion is, I'm sure there is a correct one, but whatever floats your boat is fine with me!

I got this recipe from a girlfriend of mine and made some caramel apples during Christmas. With holiday hallabaloo and school madness I just never got around to posting.

This recipe is easy and extremely versatile. It can be used for individually wrapped caramels, dipped pretzel sticks, dipped marshmallows, and caramel apples. Unfortunately, I only have pictures of the individually wrapped caramels. I will update the post when I do caramel apples again (They are definitely a repeat- Casey's family devoured them!).

Ingredients:
2 c. sugar
1 c. butter (2 sticks)
2 c. cream
1 3/4 dark corn syrup (some people use light corn syrup but the dark has better color and flavor in my opinion)

Instructions:
1) In a large pot add butter, corn syrup, sugar and 1 cup cream.
2) Stir constantly on high heat until the mixture comes to a rolling boil.


3) Slowly incorporate the remaining cup of cream while retaining the rolling boil.
4) Reduce heat until the mixture comes to a simmer.
5) Let simmer for 30-40 minutes, scraping the bottom every 15 minutes.
6) Once it starts to thicken you can begin to test the caramel using the *cold water test (I have instructions on this below if you've never done this before).

Once the caramel has reached the softball stage it is ready! It is really important to not let it cook past the softball stage- otherwise it will be too hard to eat! Take the caramel immediately off the heat and either poor into a greased pan or begin your dipping!

These are the individual caramels that I wrapped for my Christmas plates.

This picture turned out a little fuzzy, but I wanted to show how chewy the caramel is!

This caramel recipe gets 5 stars from me!

*Cold Water Test

Fill a cup with cold water and pour a small amount of caramel into the cup. Dump out the water and catch the caramel in your hand.

If you can form a ball with the caramel and it holds its shape the caramel has reached the softball stage.

If the caramel forms a firm ball that holds its shape even when pinched slightly, it has reached the hardball stage which is more desirable for brittle.

Sunday, October 31, 2010

Halloween Dinner! Roasted Chicken and Pumpkin Rolls

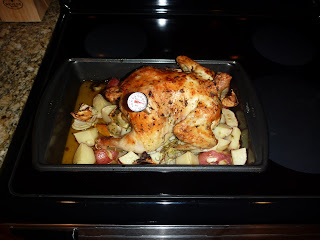
Delicious Halloween Dinner!

Roasted Chicken with Lemongrass and Kaffir Lime Leaves from Food2 and Pumpkin Rolls from Me!

Ingredients

1 (3 1/2- to 4-pound) whole roasting chicken
Salt and fresh ground pepper
1 lemon, quartered, plus 1 for juice
2 onions, peeled and quartered
2 stalks lemongrass, bruised, plus 1 tablespoon, minced
5 cloves garlic, plus 1 tablespoon, minced
3 kaffir lime leaves
1 3-inch piece ginger, peeled and chopped, plus 1 tablespoon minced
3 fresh rosemary sprigs, plus 1 tablespoon finely chopped
3 fresh thyme sprigs, plus 1 tablespoon finely chopped
1/4 cup extra-virgin olive oil, as needed
3 Yukon gold potatoes, quartered

Directions

Set an oven rack on the lower middle level and preheat the oven to 375 degrees F.

Rinse the chicken thoroughly, inside and out, under cold water, then dry it with paper towels. (Casey actually had to pat the inside of the chicken dry because I'm too squeamish about putting my hand up a chicken's butt. Yuck!)

Season the cavity with salt and pepper. Stuff the cavity with 4 lemon quarters, 4 onion quarters, lemongrass stalks, garlic cloves, kaffir lime leaves, and half each of the chopped ginger, rosemary and thyme sprigs.

In a mortar and pestle combine minced lemongrass, chopped rosemary, chopped thyme, minced ginger and minced garlic.


Add 1/4 cup olive oil and a pinch of salt and mash together with pestle. Rub the mixture under the skin on top of the breast and all over the outside of the bird. Tie the legs together with a piece of butcher's twine.

Place the quartered potatoes, remaining onion, and chopped ginger in a baking dish or roasting pan. Season with salt and pepper and place the chicken on top of the vegetables to form a makeshift rake. Slice remaining lemon in half and squeeze juice over chicken. Place the rinds in the pan with the vegetables. Drizzle the chicken with a bit more olive oil.

Roast the chicken for 1 hour and 15 minutes or until the thickest portion of the breast registers 165 degrees F.


Tip the chicken so that the juice from the cavity runs into the roasting pan. Transfer the chicken to a cutting board and let rest, uncovered, for 10 minutes before carving. Serve with roasted onions and potatoes.

Delicious! Not only was this chicken flavorful, but the white meat was just as juicy as the dark meat and the potatoes and onions were a natural, flavorful compliment!

We give this recipe: 4.5 stars

Pumpkin Rolls

First of all, a little baking tip! When baking, always use room temperature ingredients because it will make your products lighter and fluffier! Now, I'm doubling this recipe, so if you make it and your quantities don't look as big as mine, that's why. :)

2/3 c. packed pumpkin

3 eggs (room temperature!)

1 c. sugar

¾ c. flour

1 tsp. baking soda

1 tsp. cinnamon

½ tsp. salt

Cream cheese filling:

8 oz. cream cheese

1 c. powdered sugar

2 T. melted butter or margarine

1 tsp. vanilla

Preheat oven to 350áµ’.

Put pumpkin, eggs and sugar into a large bowl. In a separate small bowl, combine flour, baking soda, cinnamon and salt.


Beat pumpkin, egg and sugar mixture for 5 minutes until light and frothy.

Doesn't it look nice and frothy?

Add flour, baking soda, cinnamon and salt mixture and mix in with a spatula. When you are making quick breads, you don't want to over mix your batter because it can make your end product tough.


Line jelly roll pan with wax paper. Now, I used a Pampered Chef Stoneware pan. I love it, love it love it! It is a pain to use wax paper and you lose more roll than you keep. I greased my stoneware with copious amounts of canola oil and the end product slides out like butter! SO MUCH BETTER!

Pour pumpkin batter in pan and shake to even out.


Pop it into the oven and bake for 15 minutes if you are using a jelly roll pan. Using the stone ware it took me about 20 minutes. While that's cookin', combine all the cream cheese filling ingredients into a medium sized bowl.


Combine until smooth and creamy.


Remove pumpkin roll from the oven when the bread is golden brown and feels firm and springy to the touch.


If you are using a jelly pan with wax paper, flip pumpkin sheet onto a dish towel and gently peel off wax paper. If you are using Stoneware, loosen pumpkin sheet with a spatula on edges and as much of the underside as you can get without breaking it. I used Pampered Chef's fabulous mini spatula which you can see my handsome husband modeling here:


It worked like a charm and got the whole thing up so that when I flipped my pan over, the pumpkin sheet came right out.

Next, starting on the short side, fold towel over the edge of the pumpkin sheet and roll into a log like so:


Let rest 15 minutes. Unroll and spread cream cheese filling onto pumpkin roll.


Starting at the short end, roll into a log.


Cut in half or thirds.


Once I cut it in half I started to wrap it in tin foil like I usually do when I thought, "The pumpkin roll always sticks to the foil and rips it when I open it. Maybe if I sprinkled a little powdered sugar on the top it would give it a decorative flair and it might also help it not stick so badly!"


Then the thought naturally struck me, "Well, if the powdered sugar will help it not stick to the tin foil, maybe it will help it stick to the towel less too! I should powder the towel before I roll up the pumpkin roll!"


So I did.


It was a disaster.

So, the conclusion of this experiment is, powder your pumpkin rolls before you wrap them with foil if you so desire, but FOR GOODNESS SAKE, leave it OFF of your dish towel of you will end up with, as Tim Gunn from Project Runway says, a hot mess.


There you have it! Wonderfully delicious goodies that make great holiday gifts!

We give this recipe: 4 stars

Enjoy! :)

Happy Halloween!

I LOVE Halloween! So many fun parties, treats, costumes, lights, haunted houses and trick-or-treaters! Casey and I had three significant events this Halloween season, Casey's Work Party, Ward Chili Cook-Off, and Jasmine's Party.

Casey's Work Party Friday October 29, 3-5 PM

This was the first time I got to go to Casey's office and see where he works! His office really isn't that big so it was a pretty short tour. It also wasn't much of a party- people mostly just stayed in their offices and people took their kids around trick-or-treating to everyone's offices. There was pizza and soda in the break room. I didn't get to really talk with very many people, mostly just a "Hi, I'm so-and-so" introduction.

The adults didn't even dress up! I had our costumes all packed up in the car because I went to a Pumpkin Walk at Utah Central Gardens in Provo and I was going to go straight to Casey's office afterwards. Casey called me in the morning and said, "Nobody's dressed up! Don't come in costume!" Ugh! But I brought Sander in costume anyway.

Sander went as a broker. It was the highlight of the party.

Ward Chili Cook-Off Saturday October 30, 4-6 PM

I did make a chili but it wasn't epic so I'm not going to waste my time blogging about it or your time reading about it. We all dressed up this time and had a pretty good time chatting with the Ward members.

Casey and I went as... Can anyone guess? (Those are big "P"'s on our chest btw)

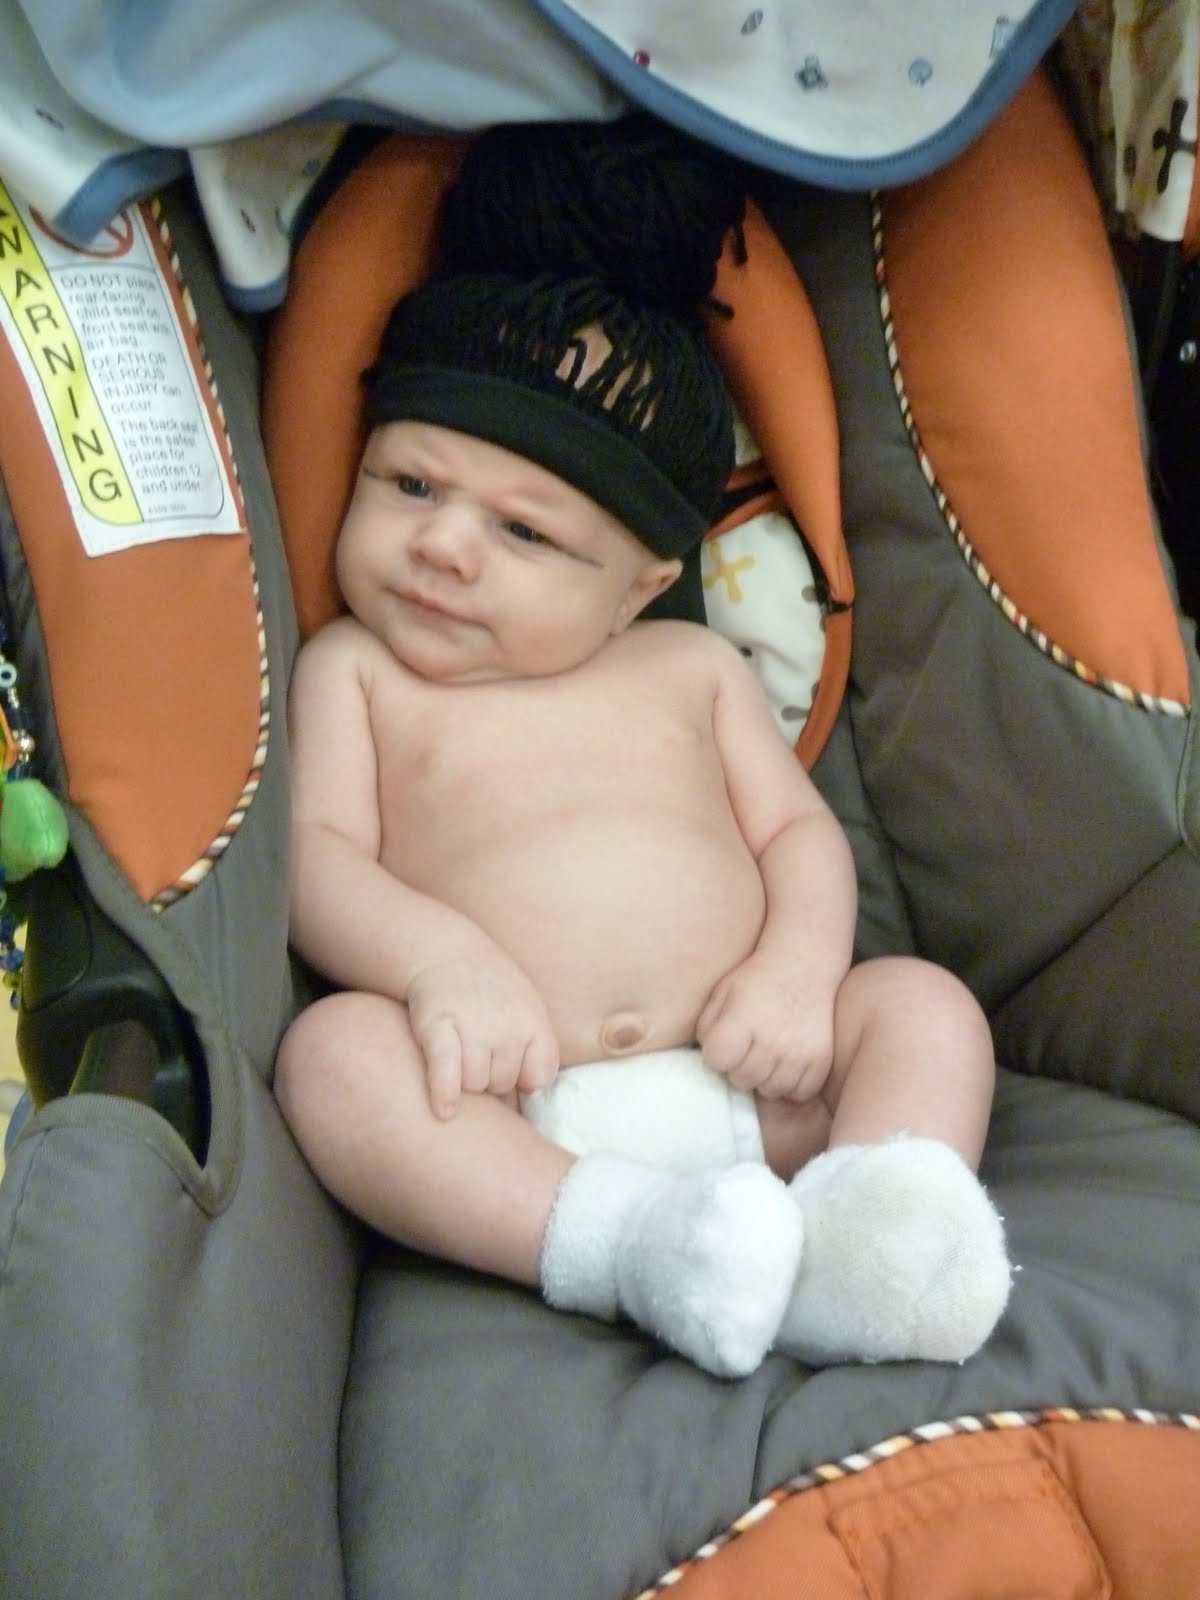
Sander was a Sumo Wrestler!
I took him in his diaper, white socks, black eye liner at each of his eyes, and I sewed some black yarn on the inside of a head band and put it into a sumo bun!


Everyone loved Sander's costume and no one could guess what Casey and I were. They eventually got it after a couple of hints though. :-)

Jasmine's Party Saturday October 30 7 PM

A friend of mine invited us to a party at her house so we went there around 7:00. We were supposed to bring a dish to share so I made a monster cheese ball.


Here's the recipe:

Ingredients

  • 2 (8 ounce) packages cream cheese, softened
  • 2 cups shredded Cheddar cheese
  • 1 tablespoon finely chopped pimento
  • 1 tablespoon finely chopped green pepper
  • 1 tablespoon finely chopped onion
  • 2 teaspoons Worcestershire sauce
  • 1 tablespoon lemon juice
  • 1 pinch salt
  • 1/2 cup finely chopped pecans

Directions

Combine the cream cheese and Cheddar cheese in a bowl. Add the pimento, green pepper, onion, Worcestershire sauce, lemon juice, and salt; mix with hands (wash them first!), and shape into a ball. Spread the pecans onto a cutting board and cover with a dish towel. Pound with a rolling pin until pecans are crushed. Roll the cheese ball in the pecans until evenly coated. Refrigerate overnight before serving. (You don't have to refrigerate overnight. I only refrigerated the cheese ball for a couple of hours and then coated the ball in the pecans and it was still great! Everyone loved it!


I used green peppers for the eyebrows and toenails, green olives for the eyes and toes, sliced baby carrots for the mouth and nose and tortilla chips dyed with red food coloring for the ears. It was such an easy, fun dish to take to a Halloween party!

Tuesday, October 26, 2010

Rosemary Chicken, Brown Butter and Balsamic Ravioli over a Bed of Spinach with a White Wine/ Balsamic Vinegar Sauce

Yum Yum.

I love to cook. Last night I made this great recipe I found on FoodNetwork.com. I changed the recipe a bit but it turned out really well. Lots of people that do cooking blogs are really good about taking pictures of their process all the way through.

I am not.

Maybe I'll get better as I think more about it and practice as I cook but I will post the original recipe first and then walk you through any changes I made.

The Original Recipe:

Ingredients

Chicken:

  • 4 pieces boneless, skinless chicken breast, 6 to 8 ounces each
  • 2 tablespoons balsamic vinegar, eyeball it, just enough to coat chicken lightly
  • 2 tablespoons extra-virgin olive oil
  • 3 stems rosemary, leaves stripped and chopped, about 2 tablespoons
  • Salt and coarse black pepper
  • 4 cloves garlic, cracked away from skin with a whack against the flat of your knife

Ravioli:

  • 1 package, 12 to 16 ounces, fresh ravioli, any flavor filling
  • 3 tablespoons butter, cut into small pieces
  • 2 tablespoons balsamic vinegar
  • 2 handfuls grated Parmigiano-Reggiano (I grated a block of Parmesan and it tasted great)
  • Salt and pepper
  • 1/4 cup chopped flat-leaf parsley, a couple of handfuls

Spinach Salad: (I skipped this part almost completely)

  • 6 slices pancetta, chopped
  • 2 tablespoons extra-virgin olive oil, 2 turns of the pan
  • 1 small shallot, finely chopped
  • 2 teaspoons sugar
  • 2 tablespoons balsamic vinegar, eyeball it
  • 1 bunch, about 10 ounces flat-leaf spinach
  • Salt and pepper

Directions

Coat chicken in balsamic vinegar, then olive oil. Season chicken with rosemary, salt and pepper and let stand 10 minutes.

Bring a large pot of water to a boil for ravioli. Salt water and drop ravioli in water. Cook 8 minutes or until raviolis expand, float to top of water, and are al dente.

Heat a medium nonstick skillet over medium high heat. Add chicken breasts and cracked garlic to the pan. Cook chicken 12 minutes, or until juices run clear, turning occasionally. The balsamic vinegar will produce a deep brown, sweet finish on the chicken as it cooks.

When the chicken is 2 or 3 minutes away from done, heat a second skillet over medium low to medium heat. To the second skillet, add butter to the pan and let it begin to brown.

Remove chicken from the first skillet and transfer to a warm platter. In a skillet over medium high heat and add the pancetta. Brown the pancetta bits, about 2 or 3 minutes, then transfer to paper towels todrain and return pan to heat, reducing heat to medium. Add oil and shallots to the pan and let the shallots saute 2 minutes.

When the butter for the ravioli has browned, add cooked ravioli to the pan and turn in butter to heat through. Add balsamic vinegar to the ravioli and cook a minute or 2 longer to reduce the vinegar and glaze the ravioli. The vinegar will become thick and syrup like. Addcheese, parsley, salt and pepper to the pasta and remove the pan from the heat.

To the sauteed shallots for the spinach salad, add sugar and cook sugar with shallots 1 minute. Add vinegar to the pan, scraping up pan drippings. Add spinach to the dressing and turn to wilt and coat it evenly in sweet vinaigrette. Add crisp pancetta to the salad.

Serve chicken along side ravioli and spinach salad, all on the same dinner plate.

My Version:

So, obviously I didn't follow this recipe exactly. I covered my chicken with a lid to help infuse it with the garlic and cook faster but it still took longer than 12 minutes- maybe because my breasts were very plump (no pun intended). The rest is all the same up until the part about the Spinach salad. I didn't have pancetta and Casey doesn't like onions so I pretty much scrapped the whole thing.

I heated a large white bowl in the microwave for a minute and then put down a bed of plain Spinach. On top of the Spinach I placed the balsamic and brown butter glazed raviolis.


Doesn't that brown glaze on the ravioli look delicious!? I also sprinkled the parsley

on top of it, but not as much as the recipe says. I just eyeballed it because I think

the recipe called for WAY too much.


Next, I was impatient for the chicken to be done, so I sliced up the breasts after they started to get a nice glaze on them from cooking in the balsamic vinegar. After that the chicken was done in a couple of minutes.


After the chicken was done I plopped it right on top of the ravioli's. There was still some remaining brown bits and vinegar in the pan so I decided to make a little sauce on the fly. I added a little white wine to my hot pan and a little more balsamic vinegar for flavor and color. Using those ingredients I deglazed the pan and then let it reduce for a couple of minutes until it started to look a little thick and syrupy (Is that a word?? If it's not, I'm coining it!). Once the sauce reached the syrupy consistency I poured it over the whole dish.


Delicious! I'm so glad I did the sauce! It was a lot less work than the salad in this recipe and the sauce dripped down onto the spinach making a nice dressing to soften the spinach while adding a little extra juicy-ness to the chicken. The whole cloves of garlic were really good too.

A little tip about garlic: The bigger the garlic, the milder the flavor. As large cloves of cracked garlic cook for a long time, they get very mellow, sweet and soft. I ate them right alongside the chicken and they were delicious.

Casey's rating: 5 stars
My rating: 5 stars

This is a pretty simple dish that I would definitely do again. All in all, it took me about 35 minutes to make the dinner from start to finish, but it looks and tastes much more impressive.