Showing posts with label food. Show all posts

Thursday, March 24, 2011

Delicious Chewy Caramel

Caramel- such a heavenly invention! First of all, let's talk about the elephant in the room. Do I pronounce it "ka-ra-mel" and "car-mul?" I actually use both so you can't judge me for one or the other- my opinion is, I'm sure there is a correct one, but whatever floats your boat is fine with me!

I got this recipe from a girlfriend of mine and made some caramel apples during Christmas. With holiday hallabaloo and school madness I just never got around to posting.

This recipe is easy and extremely versatile. It can be used for individually wrapped caramels, dipped pretzel sticks, dipped marshmallows, and caramel apples. Unfortunately, I only have pictures of the individually wrapped caramels. I will update the post when I do caramel apples again (They are definitely a repeat- Casey's family devoured them!).

Ingredients:
2 c. sugar
1 c. butter (2 sticks)
2 c. cream
1 3/4 dark corn syrup (some people use light corn syrup but the dark has better color and flavor in my opinion)

Instructions:
1) In a large pot add butter, corn syrup, sugar and 1 cup cream.
2) Stir constantly on high heat until the mixture comes to a rolling boil.


3) Slowly incorporate the remaining cup of cream while retaining the rolling boil.
4) Reduce heat until the mixture comes to a simmer.
5) Let simmer for 30-40 minutes, scraping the bottom every 15 minutes.
6) Once it starts to thicken you can begin to test the caramel using the *cold water test (I have instructions on this below if you've never done this before).

Once the caramel has reached the softball stage it is ready! It is really important to not let it cook past the softball stage- otherwise it will be too hard to eat! Take the caramel immediately off the heat and either poor into a greased pan or begin your dipping!

These are the individual caramels that I wrapped for my Christmas plates.

This picture turned out a little fuzzy, but I wanted to show how chewy the caramel is!

This caramel recipe gets 5 stars from me!

*Cold Water Test

Fill a cup with cold water and pour a small amount of caramel into the cup. Dump out the water and catch the caramel in your hand.

If you can form a ball with the caramel and it holds its shape the caramel has reached the softball stage.

If the caramel forms a firm ball that holds its shape even when pinched slightly, it has reached the hardball stage which is more desirable for brittle.

Wednesday, December 1, 2010

Sweepstakes Sabotage

So, Food Network is doing a Spice Up Your Season Pie Sweepstakes. Don't bother going to the site! The Sweepstakes is already over.

I found out about the Sweepstakes almost two months ago but I have waited to blog about it until now so that I would not sabotage my chances of winning!

The prize is $4,500 and TEN Food Network Cookbooks.

Forget the cash! I want the recipes!

I don't expect to win because I have terrible luck when it comes to sweepstakes, raffles, or anything of the sort. (Just ask my husband if you don't believe me. He doesn't even come near me after his bike races before they do the raffle because my bad luck rubs off on him and he doesn't win anything!) BUT! I did diligently enter my information into the contest almost everyday from the time that I got the e-mail notification until the Sweepstakes ended on November 29.

Now, get this- after an entrant inputs their personal information and submits it into the sweepstakes a new page pops up saying, "Thank You for Entering the Spice Up Your Season Pie Sweepstakes!" Then it has a Facebook, Twitter and MySpace Like/Share button off to the side and it prompts you to: "Tell Your Friends About The Sweepstakes!"

Wait........ WHAT?

My chances of winning the sweepstakes are considerable diminished every time someone submits an entry and you want me to sabotage myself by telling my friends to enter your Sweepstakes?! What Food Network!? Are YOU Crazy?!?

Thus ends my evil plan to delay my blogging about this Food Network Madness so as to give my already slim chances (due to my terrible luck) of winning the Sweepstakes and ALL TEN COOKBOOKS a small boost.

MUAHAHAHAHAHAHAHAHAHAHAHA!

Judges pick the winners December 20th. I'll let you know what I get for my consolation prize for not getting picked.


.........................what do you mean losers don't get a consolation prize?

Wednesday, November 10, 2010

The Tale of the Blue Lemon

Casey and I had date night this weekend! We got a coupon in the mail to a restaurant called the Blue Lemon. We'd heard some pretty good things about it so we decided to go to the one closest to us in Highland and we were COMPLETELY unimpressed. Now, I don't want to be a hater, so I will try to be as positive as possible, but.... it wasn't a great experience. I'll cover efficiency, atmosphere / cleanliness, plating, taste, and expectations.

Efficiency- F

Casey and I arrived at the restaurant around 7 and, thanks to my line magic, found only three women, who were all together, ahead of us in the line. It took over five minutes for the hostess to take their order. I told Casey to go grab a seat while I ordered so he wouldn't have to hold Sander in his carrier the whole time. When I finally got to the register I saw a sign advertising their Caramel Apple Cider so I asked the hostess, "How much is it for a cup of the Caramel Apple Cider." She said she didn't know so it took another minute for her to look up how much that was (3.90 for a small btw! Can you say, ridickilus?). After another minute she finally got my order, handed me a number (you know how you fold paper in half and stand it up? It was a small, plastic one of those) and I sat down.

The wait time for the food wasn't too bad but it was hard for the waitresses to see the little plastic tent numbers on the tables. They would walk around the dining room for a long time, carrying plates of food, leaning over tables, looking for their corresponding number. Blue Lemon should put the numbers on stands or something so the waitresses can see them more easily! Poor waitresses!

Atmosphere / Cleanliness B+

Overall, Blue Lemon achieves a pretty trendy atmosphere. The restaurant was crowded, so the buzz of conversations combined with the music playing at just the right volume to achieve a mix between a club and a restaurant made the whole place seem pretty chic. The tables were nicely spaced so it was not too crowded but they could still get in as much seating as possible. Unfortunately the place where I sat had a HUGE sticky spot on the floor that left my shoes sticky for a really long time which is highly annoying.

To be fair, I didn't really look to see if there were other sticky spots on the floor, so it could have just been where I was sitting. Luckily, I could look at all of the good looking food being forever carried around the dining room by the waitresses to take my attention off of the floor until our food arrived.

Plating - A

The plating was chic and creative making the food appear, at first glance, to be more appropriate in a four or five star restaurant instead of a three. The plateware itself was well chosen to appear modern and upscale. However, when the waitress plunked my food down in front of me I was really surprised to find that the plates are actually lightweight plastic! My plate even had rubber feet on the bottom which completely downgrades the plateware from upscale to middle class.

Taste - C+

I got a steak with Gorgonzola cheese while my hubbie got the Salmon (some of the most expensive dishes on the menu since it was buy one, get one free with our coupon. But they were still only $13) and we split. The steak description was medium rare but it came out well done which made the steak a little chewy instead of melt-in-your-mouth-tender, but the steak with the gorgonzola cheese was a great combination.

Totally brown throughout = well-done.

Casey's Salmon was flaky and had good flavor, as did the potato gallete thing that came with it, however, they burnt the bottom of it.


It's not really anything to be snobby about, but with such a small menu it seems like they should be able to do the dishes they do have on the menu really well.

Expectations - D-

At restaurants like Red Lobster or Olive Garden (which this restaurant is probably on par with) have menus with prices that usually end in $ .99. More upscale restaurants generally don't show cents or dollar signs. They just have something like:

Filet Minon 45

This is how the menu at Blue Lemon looked also. I already mentioned that the plating was well done and also added to an upscale feel. Then we discovered that the plates were plastic and the food was burnt or over cooked!

It's not like the restaurant was terrible, I think it's just the fact that the restaurant had so many cues that made me expect something more than I actually got. It's all about expectations and this restaurant didn't live up the things it showed me to expect.

There was a bistro which I think is a great idea and they did have an entire menu of sandwiches and some soups that also looked good which I didn't get to try.

Would I go back? Not really sure. If I got another coupon I might go to try one of their sandwiches now that I have a more appropriate set of expectations, but the first experience left me feeling so disappointed that it kinda turned me off.. :(

Overall Rating - C-

Sunday, October 31, 2010

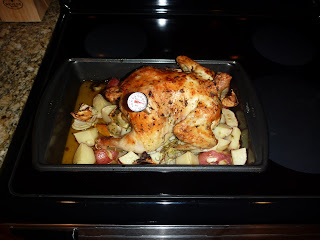
Halloween Dinner! Roasted Chicken and Pumpkin Rolls

Delicious Halloween Dinner!

Roasted Chicken with Lemongrass and Kaffir Lime Leaves from Food2 and Pumpkin Rolls from Me!

Ingredients

1 (3 1/2- to 4-pound) whole roasting chicken
Salt and fresh ground pepper
1 lemon, quartered, plus 1 for juice
2 onions, peeled and quartered
2 stalks lemongrass, bruised, plus 1 tablespoon, minced
5 cloves garlic, plus 1 tablespoon, minced
3 kaffir lime leaves
1 3-inch piece ginger, peeled and chopped, plus 1 tablespoon minced
3 fresh rosemary sprigs, plus 1 tablespoon finely chopped
3 fresh thyme sprigs, plus 1 tablespoon finely chopped
1/4 cup extra-virgin olive oil, as needed
3 Yukon gold potatoes, quartered

Directions

Set an oven rack on the lower middle level and preheat the oven to 375 degrees F.

Rinse the chicken thoroughly, inside and out, under cold water, then dry it with paper towels. (Casey actually had to pat the inside of the chicken dry because I'm too squeamish about putting my hand up a chicken's butt. Yuck!)

Season the cavity with salt and pepper. Stuff the cavity with 4 lemon quarters, 4 onion quarters, lemongrass stalks, garlic cloves, kaffir lime leaves, and half each of the chopped ginger, rosemary and thyme sprigs.

In a mortar and pestle combine minced lemongrass, chopped rosemary, chopped thyme, minced ginger and minced garlic.


Add 1/4 cup olive oil and a pinch of salt and mash together with pestle. Rub the mixture under the skin on top of the breast and all over the outside of the bird. Tie the legs together with a piece of butcher's twine.

Place the quartered potatoes, remaining onion, and chopped ginger in a baking dish or roasting pan. Season with salt and pepper and place the chicken on top of the vegetables to form a makeshift rake. Slice remaining lemon in half and squeeze juice over chicken. Place the rinds in the pan with the vegetables. Drizzle the chicken with a bit more olive oil.

Roast the chicken for 1 hour and 15 minutes or until the thickest portion of the breast registers 165 degrees F.


Tip the chicken so that the juice from the cavity runs into the roasting pan. Transfer the chicken to a cutting board and let rest, uncovered, for 10 minutes before carving. Serve with roasted onions and potatoes.

Delicious! Not only was this chicken flavorful, but the white meat was just as juicy as the dark meat and the potatoes and onions were a natural, flavorful compliment!

We give this recipe: 4.5 stars

Pumpkin Rolls

First of all, a little baking tip! When baking, always use room temperature ingredients because it will make your products lighter and fluffier! Now, I'm doubling this recipe, so if you make it and your quantities don't look as big as mine, that's why. :)

2/3 c. packed pumpkin

3 eggs (room temperature!)

1 c. sugar

¾ c. flour

1 tsp. baking soda

1 tsp. cinnamon

½ tsp. salt

Cream cheese filling:

8 oz. cream cheese

1 c. powdered sugar

2 T. melted butter or margarine

1 tsp. vanilla

Preheat oven to 350áµ’.

Put pumpkin, eggs and sugar into a large bowl. In a separate small bowl, combine flour, baking soda, cinnamon and salt.


Beat pumpkin, egg and sugar mixture for 5 minutes until light and frothy.

Doesn't it look nice and frothy?

Add flour, baking soda, cinnamon and salt mixture and mix in with a spatula. When you are making quick breads, you don't want to over mix your batter because it can make your end product tough.


Line jelly roll pan with wax paper. Now, I used a Pampered Chef Stoneware pan. I love it, love it love it! It is a pain to use wax paper and you lose more roll than you keep. I greased my stoneware with copious amounts of canola oil and the end product slides out like butter! SO MUCH BETTER!

Pour pumpkin batter in pan and shake to even out.


Pop it into the oven and bake for 15 minutes if you are using a jelly roll pan. Using the stone ware it took me about 20 minutes. While that's cookin', combine all the cream cheese filling ingredients into a medium sized bowl.


Combine until smooth and creamy.


Remove pumpkin roll from the oven when the bread is golden brown and feels firm and springy to the touch.


If you are using a jelly pan with wax paper, flip pumpkin sheet onto a dish towel and gently peel off wax paper. If you are using Stoneware, loosen pumpkin sheet with a spatula on edges and as much of the underside as you can get without breaking it. I used Pampered Chef's fabulous mini spatula which you can see my handsome husband modeling here:


It worked like a charm and got the whole thing up so that when I flipped my pan over, the pumpkin sheet came right out.

Next, starting on the short side, fold towel over the edge of the pumpkin sheet and roll into a log like so:


Let rest 15 minutes. Unroll and spread cream cheese filling onto pumpkin roll.


Starting at the short end, roll into a log.


Cut in half or thirds.


Once I cut it in half I started to wrap it in tin foil like I usually do when I thought, "The pumpkin roll always sticks to the foil and rips it when I open it. Maybe if I sprinkled a little powdered sugar on the top it would give it a decorative flair and it might also help it not stick so badly!"


Then the thought naturally struck me, "Well, if the powdered sugar will help it not stick to the tin foil, maybe it will help it stick to the towel less too! I should powder the towel before I roll up the pumpkin roll!"


So I did.


It was a disaster.

So, the conclusion of this experiment is, powder your pumpkin rolls before you wrap them with foil if you so desire, but FOR GOODNESS SAKE, leave it OFF of your dish towel of you will end up with, as Tim Gunn from Project Runway says, a hot mess.


There you have it! Wonderfully delicious goodies that make great holiday gifts!

We give this recipe: 4 stars

Enjoy! :)

Tuesday, October 26, 2010

Rosemary Chicken, Brown Butter and Balsamic Ravioli over a Bed of Spinach with a White Wine/ Balsamic Vinegar Sauce

Yum Yum.

I love to cook. Last night I made this great recipe I found on FoodNetwork.com. I changed the recipe a bit but it turned out really well. Lots of people that do cooking blogs are really good about taking pictures of their process all the way through.

I am not.

Maybe I'll get better as I think more about it and practice as I cook but I will post the original recipe first and then walk you through any changes I made.

The Original Recipe:

Ingredients

Chicken:

  • 4 pieces boneless, skinless chicken breast, 6 to 8 ounces each
  • 2 tablespoons balsamic vinegar, eyeball it, just enough to coat chicken lightly
  • 2 tablespoons extra-virgin olive oil
  • 3 stems rosemary, leaves stripped and chopped, about 2 tablespoons
  • Salt and coarse black pepper
  • 4 cloves garlic, cracked away from skin with a whack against the flat of your knife

Ravioli:

  • 1 package, 12 to 16 ounces, fresh ravioli, any flavor filling
  • 3 tablespoons butter, cut into small pieces
  • 2 tablespoons balsamic vinegar
  • 2 handfuls grated Parmigiano-Reggiano (I grated a block of Parmesan and it tasted great)
  • Salt and pepper
  • 1/4 cup chopped flat-leaf parsley, a couple of handfuls

Spinach Salad: (I skipped this part almost completely)

  • 6 slices pancetta, chopped
  • 2 tablespoons extra-virgin olive oil, 2 turns of the pan
  • 1 small shallot, finely chopped
  • 2 teaspoons sugar
  • 2 tablespoons balsamic vinegar, eyeball it
  • 1 bunch, about 10 ounces flat-leaf spinach
  • Salt and pepper

Directions

Coat chicken in balsamic vinegar, then olive oil. Season chicken with rosemary, salt and pepper and let stand 10 minutes.

Bring a large pot of water to a boil for ravioli. Salt water and drop ravioli in water. Cook 8 minutes or until raviolis expand, float to top of water, and are al dente.

Heat a medium nonstick skillet over medium high heat. Add chicken breasts and cracked garlic to the pan. Cook chicken 12 minutes, or until juices run clear, turning occasionally. The balsamic vinegar will produce a deep brown, sweet finish on the chicken as it cooks.

When the chicken is 2 or 3 minutes away from done, heat a second skillet over medium low to medium heat. To the second skillet, add butter to the pan and let it begin to brown.

Remove chicken from the first skillet and transfer to a warm platter. In a skillet over medium high heat and add the pancetta. Brown the pancetta bits, about 2 or 3 minutes, then transfer to paper towels todrain and return pan to heat, reducing heat to medium. Add oil and shallots to the pan and let the shallots saute 2 minutes.

When the butter for the ravioli has browned, add cooked ravioli to the pan and turn in butter to heat through. Add balsamic vinegar to the ravioli and cook a minute or 2 longer to reduce the vinegar and glaze the ravioli. The vinegar will become thick and syrup like. Addcheese, parsley, salt and pepper to the pasta and remove the pan from the heat.

To the sauteed shallots for the spinach salad, add sugar and cook sugar with shallots 1 minute. Add vinegar to the pan, scraping up pan drippings. Add spinach to the dressing and turn to wilt and coat it evenly in sweet vinaigrette. Add crisp pancetta to the salad.

Serve chicken along side ravioli and spinach salad, all on the same dinner plate.

My Version:

So, obviously I didn't follow this recipe exactly. I covered my chicken with a lid to help infuse it with the garlic and cook faster but it still took longer than 12 minutes- maybe because my breasts were very plump (no pun intended). The rest is all the same up until the part about the Spinach salad. I didn't have pancetta and Casey doesn't like onions so I pretty much scrapped the whole thing.

I heated a large white bowl in the microwave for a minute and then put down a bed of plain Spinach. On top of the Spinach I placed the balsamic and brown butter glazed raviolis.


Doesn't that brown glaze on the ravioli look delicious!? I also sprinkled the parsley

on top of it, but not as much as the recipe says. I just eyeballed it because I think

the recipe called for WAY too much.


Next, I was impatient for the chicken to be done, so I sliced up the breasts after they started to get a nice glaze on them from cooking in the balsamic vinegar. After that the chicken was done in a couple of minutes.


After the chicken was done I plopped it right on top of the ravioli's. There was still some remaining brown bits and vinegar in the pan so I decided to make a little sauce on the fly. I added a little white wine to my hot pan and a little more balsamic vinegar for flavor and color. Using those ingredients I deglazed the pan and then let it reduce for a couple of minutes until it started to look a little thick and syrupy (Is that a word?? If it's not, I'm coining it!). Once the sauce reached the syrupy consistency I poured it over the whole dish.


Delicious! I'm so glad I did the sauce! It was a lot less work than the salad in this recipe and the sauce dripped down onto the spinach making a nice dressing to soften the spinach while adding a little extra juicy-ness to the chicken. The whole cloves of garlic were really good too.

A little tip about garlic: The bigger the garlic, the milder the flavor. As large cloves of cracked garlic cook for a long time, they get very mellow, sweet and soft. I ate them right alongside the chicken and they were delicious.

Casey's rating: 5 stars
My rating: 5 stars

This is a pretty simple dish that I would definitely do again. All in all, it took me about 35 minutes to make the dinner from start to finish, but it looks and tastes much more impressive.

Wednesday, April 15, 2009

Isn't life funny?

Hello all! How is life? Crazy as ever I'm sure. :-)

Well, to catch you up, Casey is traveling again- going to Kansas this time. Not so far away but it is a really busy case and it keeps him hopping. I am seeing the last my Secretary days- I turned in my two weeks and my last day is May 5th. Then Casey and I are heading out to Utah for the St. George triathlon! At this point I still don't have a bike for my triathlon but Casey and I are still looking and keeping our fingers crossed. I went to a bike shop to get measured the other day and they were really helpful in teaching me what to look for in a bike for myself. Today I did the biking and running portion in 1 1/2 hours and I felt really good afterward so I think I will be able to add the swimming with no problem.

I did decide to do Pampered Chef- I have my first show tomorrow (Thursday) and I'm really excited for it. I hope it turns out well. I am expecting about 10 people which I think will be a good amount. I got my New Consultant kit full of products a couple of weeks ago and I had a blast- I spent at least two hours playing with everything and reading all of the recipes and care instructions that are included with them. I'm really excited to be able to show them to other people.

Last Saturday Casey and I made the most AMAZING cinnamon rolls. It was a recipe for the bread maker though so when I figure out how to translate it to be made without one- I will post here. :-)

So, I really wanted to buy a big professional camera to take all our pictures and to shoot some of the wildlife around here- but I'm now giving up that hope in exchange for a new laptop! Then Casey and I will both have one and mine will double as our home desktop which I am super excited for since our desktop has been acting up lately.

Well, that is about all that is new here- just surviving and taking life one day at a time. I hope you all had a Happy Easter!

Monday, March 2, 2009

Cookin' Tips

Ok. I've been doing a lot of reading of recipes and have noticed that there are a lot of misconceptions about basic cooking that need to be rectified. Here is my list:

1. When cooking pasta- you do not need to add oil or salt to the water. Salt will give it a little flavor- but usually you are just going to cover the noodles with a yummy sauce anyway. If you don't want your noodles to stick- putting oil in the water is not the way to do it. All that does is make it harder for the sauce to stick to the noodles and sauce will make them less sticky anyway. If you are using pasta not covered in sauce or you are saving leftover noodles and don't want them to be a hard clump in the fridge- add a little bit of oil after the noodles have been drained and are back in the pot- then stir it around with a big spoon to coat them. They will not stick together but its also possible that nothing else will stick to them either.

2. When cooking- you do not need to use expensive extra fine virgin oil, regular cheap olive oil will do just fine. Everyone wants to eat healthier and olive oil is one of the healthiest oils we can have in our diet, so it is understandable why everyone wants to buy the very expensive extra virgin olive oil and it can be worth your money- if used wisely.

Olive oil is rich in polyphenols, antioxidants and lots of other big words that most of us don't know. These big words have health benefits like lowering cholesterol, protecting cells against heart disease and cancer and can help slow aging. Whether olive oil is extra virgin, virgin or 100% olive oil depends on how many pressings the olives have gone through. Extra Virgin oil is made from the first pressing of olive oil and contains a higher portion of plant extracts- that is why it is healthier and, of course, more expensive. It is best to save this kind of oil for use in foods that will not be exposed to high heat. The compounds that make this oil so healthy will break down when exposed to high temperatures and what you are left with is pretty much the same as the cheap, basic 100% olive oil- so why not use that kind to begin with? Save the expensive stuff for salad dressings and Italian dinner night (imitate Macaroni Grill and pour some Extra Virgin in a dish, grind up some fresh cracked pepper and use it as a dip for warm chewy bread. Then you can savor the flavor of the Extra Virgin Olive Oil and you get all of the nutrients that you pay for.)

If you don't want the strong taste of olive oil in a dish that you are making- try canola oil. It has better fats than vegetable oil (mostly monounsaturated which are healthy fats- the body can easily break them down for nutrients) and has a very neutral flavor. It is great for things like browines or other sweets where the olive oil taste might be undesirable or make it taste a little off. I use a canola and vegetable oil blend so that I still get the richness of vegetable oil- but its not so bad for you.

Well that's my diatribe! :-) I hope it was educational and helpful to you. If you guys like what you read then I can keep posting tips like these as I continue learning through my classes. And if you have any cooking questions I would love to learn more and answer your questions.

All my love and Good Eating!